Thursday, January 21, 2010

A Winter Menu :: Friday Dinner with Friends


For dinner on Friday, I came up with a little feast of winter: fennel, lemons, parsnip, and rack of lamb. What better way to spend a friday night in the middle of January than with friends, at home, enjoying a roast? :-) 

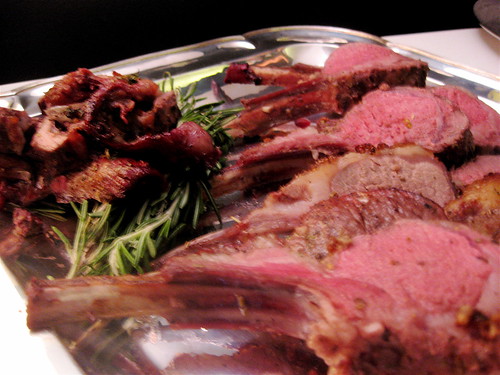
I love rack of lamb.  And not just because I love roasts... which I do.  But, because it's incredibly flavorful, in a very delicate, mild way, not the game-y flavor people usually think of when they hear 'lamb'.  The meat remains rare and tender, and the herbs are perfectly aromatic.  It really is a beautiful dish...and don't tell anybody, but it's pretty easy to cook.  Season the lamb, and place in the oven ... that's it. Really! 

When buying the meat (which I usually do the day i'm going to cook it, I never buy frozen), I ask the butcher to 'french' the rack of lamb, which means that they take the fat off the bones and give it it's beautifully elegant shape.  But I ask them to give me those trimmings.  It seasons  the roast, and helps keep it from drying.  In fact, the crispy fat gets so delicious in the oven, I always serve it on the platter.  A. quickly devours it!  

If your butcher does not have a rack the size you need, but a smaller one and then get individual pieces (lamb lollipops) and place in the baking dish along with the roast.  Just be careful, because the loose pieces will cook faster, so remove them from the oven a bit before the rack is ready.

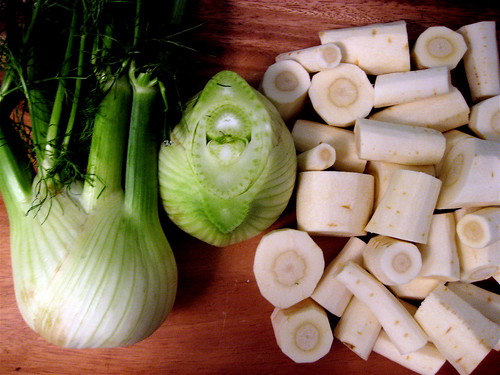
I served it with a creamy puree of parsnip and a fresh salad of shaved fennel (which is officially my new favorite vegetable!).  Don't you love winter dinners? So rich and comforting.

Enjoy!

Winter Dinner Menu:
- Rosemary Thyme Roasted Frenched Rack of Lamb
- Shaved Fennel Salad
- Parsnip Puree


ROSEMARY THYME ROASTED RACK OF LAMB
Rack of lamb (assume about 3 pieces per person)
Sprigs of Rosemary
Sprigs of Thyme
Herbes de Provence (about a tablespoon)
a generous tablespoon of Dijon Mustard
Olive Oil (about 1/4 cup)
1 tablespoon Worcester Sauce
Juice of 1/2 a lemon
2 cloves of garlic, crushed
Salt & Pepper
Red Wine (about half a bottle)

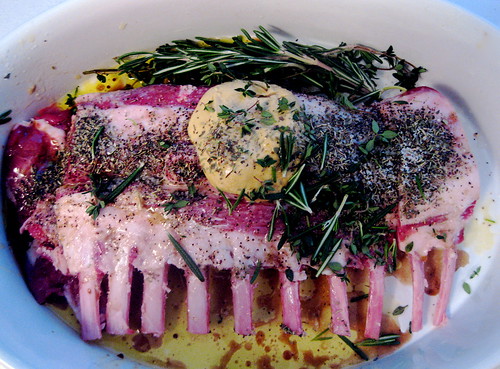
Place the lamb and trimmings on a baking dish with the fat side facing up.  Rub the lamb with olive oil and mustard.  Season with salt, pepper, garlic, and herbes de provence.  Add the wine, lemon juice, and Worcester sauce to the baking dish.  Place the sprigs of rosemary and thyme underneath the rack loosening a few leaves beforehand and rubbing it on the roast.  Allow the lamb to marinate for 1 hour in the fridge. Place the trimming over the rack for extra flavor.

Preheat the oven to 350F.  Cook the lamb until the inside temperature reaches 125F (medium rare) about 25 minutes but keep an eye on it and make sure you do not overcook. Then set the oven on broil (500F) and cook the lamb for another 5 minutes.

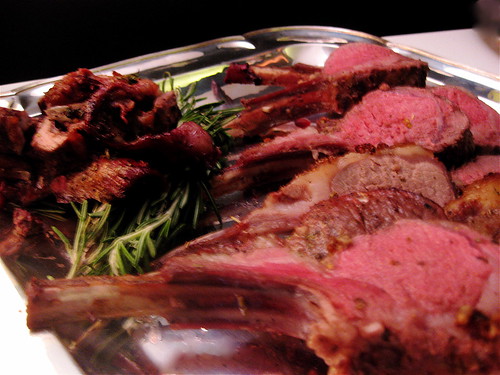
Take the pan out of the oven, set the lamb on a cutting board and let it rest for 5 minutes.  You can serve the rack already cut, or cut at the table.  I like to serve it cut, carve each piece between the bones.  Serve with the red wine sauce and fat.

PARSNIP PUREE
5 large Parsnips, peeled
2 tablespoons Heavy Cream
Salt & Pepper to taste

Bring a large pot of water to a boil, add plenty of salt. Chop parsnips into 1" pieces. Cook the parsnip until tender, about 25 minutes. Drain the water and transfer the parsnip to a large bowl. Using an immersion blender or mixer, start to puree. Add the cream, and salt & pepper to taste. You can mix it to be as smooth or as chunky as you want... I like it somewhere in between. Serve immediately, or cover and reheat briefly right before serving.

SHAVED FENNEL SALAD
(serves 4)
2 large bulbs of fennel
Good quality Olive Oil
Squeeze of Lemon juice
Kosher salt & ground pepper

Cut the stems off the fennel and remove the outer skin.  Place
Thinly cut the fennel (as thin as you can, try a mandolin).  Season with olive oil, a squeeze of a lemon (or orange!), and salt and pepper.  Serve chilled.

Orange Inspired :: 'Get Well' Basket & an update


Nothing like a home delivery of baked treats to cheer somebody up, right? Give me a freshly baked cake and I'd be better in no time. :-) A.'s coworker is home recovering from surgery, so we thought we'd put together a little 'Get Well' basket.

Being that oranges are in peak season (doesn't it seem a little odd that citrus season in right in the middle of winter?) I filled it with my favorite orange goodies!

In the basket:
- Carrot Cake w/Orange Zest Cream Cheese Frosting
- Raisin Scones (my basic scone recipe but I added 2 tbsp of butter to make them extra yummy!)
- Orange Marmalade (Barefoot Contessa's recipe, but i peel the orange to remove the pith which removes the bitterness)
- Orange Maple Butter (from my french toast recipe)
- & fresh fruit of course


I packaged the jam in a mason jar (my fave!) so that it would keep for a few weeks, and put the frosting and delicious butter in ramekins. All wrapped in colorful twine and in a small rattan basket. Name tags included... perfect!

Oh , and my update? I've officially joined the Twitter universe! I'm Still trying to figure it all out (which is making me feel slightly old!), but I'm already obsessed, and hope we can be friends! To follow me on twitter, click here!

Tuesday, January 19, 2010

From the Oven :: Homemade Baguettes


Yes... those are my very own homemade baguettes!!!  I can't tell you how proud (and kind of shocked) I am.  There were a few moments there when I thought they weren't going to make it... but they did, and they are delicious! 

It was one of my New Year's cooking resolutions to learn to bake bread.  So, I bought an oven stone, a giant bag of King Arthur flour, yeast, I printed numerous instructions, and spent the weekend making bread.   ...Yes, the entire weekend.

This all started on Friday when I told A. that we'd be having deliciously crusty baguettes, hot out of the oven, for breakfast the next morning.  ...Well, it didn't go as planned.  Turns out making a baguette is complicated baking... there's so many different methods out there.  But, by Sunday night at around 11 pm - after 5 lbs of flour, 3 recipes, and 6 loafs later:  I had the perfect baguette!   It was probably the most delicious baguette I've had (...second is Balthazar's of course) mostly because I put so much work into it.  :-)  

After a few attempts at different instructions,  I finally found the perfect recipe from King Arthur Flour.  If you've never made bread, I very much recommend you give it a try.  Just have a little patience with the process... you will be well rewarded at the end. There's nothing more delicious than warm bread out of the oven.  Hope this helps! 

BAGUETTES (from King Arthur.com)
For the starter:
1/2 cup cool water
1 cup unbleached all-purpose flour
1/16 teaspoon instant yeast

For the Dough:
1 teaspoon active dry yeast
1 cup lukewarm water
3 1/2 cups unbleached all-purpose flour
1 1/2 teaspoons salt

1.  Make the starter.  Mix all the starter ingredients and let it sit (in a covered bowl) overnight (or 14 hours).  You'll be amazed with what you see the next day.  The starter will be completely  bubbled the next day...imagine the appearance of a pancake that is heating up.


2.  Make the dough.  Using the starter mixture you start to build the dough by adding the yeast (if you are not using instant yeast you will want to add the yeast to the water first and allow it to dissolve), water, flour and salt and kneading until the mixture is somewhat smooth, cohesive dough.  This is the perfect project for the dough hook attachment on a stand mixer.

Oil a large bowl, and place the dough inside and cover with plastic wrap.  You are going to let the dough rise for a total of 3 hours.  Every hour you will 'punch' the dough down (don't literally punch it...rather deflate it) and let it rise again.  Repeat.


3.  Work the dough.  Place the dough on a floured surface, divide in 3 equal parts.  Cover the dough with plastic wrap and let it sit for 20 minutes.  Now you're ready to start forming the baguette!  You will take each piece, and fold it over itself, flatten it slightly, and press the edges to seal.  This will extend the dough into a log shape.  Repeat twice until the baguette is about 15" long.  Place the finished log on a  heavily floured towel or cheese cloth.  Repeat with the other 2 pieces of dough.  


4. Rise again.  Cover the loaves with greased plastic wrap and allow the to rise for another 90 minutes.  


5.  Bake.  Preheat the oven to 450F.  Roll the floured loafs onto an oven stone or lightly greased baking sheet.  With a pairing knife, make 3 angled slits on the top of the loafs (if you see air pockets in the inside of the dough....perfect!).  Spritz each baguette with plenty of water (this will create the crunchy crust).  Bake for 25 minutes.


6.  Enjoy!!! I must have eaten one whole baguette with a bit of butter and kosher salt right when it came out of the oven.  The next day, I sliced one in half and made Pan con Tomate by toasting the slices, rubbing them lightly with a clove of garlic, and topping with chopped tomato, salt & pepper, and plenty of olive oil.  Delicious!  


In NYC :: Wine Expo

For all of you in NYC, the New York Wine Expo is coming up soon! Over 150 wineries, from all over the world, all with their wines to sample. A. and I are especially excited for the "Grand Tasting" on Saturday, Feb. 28th! Doesn't that sound like a wonderful adventure? :-) Click here to buy tickets. Oh and good news: use the promo code "337WINE" for $10 off tickets for the expo on Feb. 27th or for Feb. 28th's Grand Tasting.

Enjoy!

Saturday, January 16, 2010

Healthy Eating :: Green Tarragon Chicken Salad


I ♥ chicken salad!  It's so delicious and easy in a sandwich or even in chunky bits served with bread on the side.  But, let's face it, it's not the healthiest salad considering the amount of mayonnaise in it.  So, I set out to make a healthy version as a quick weeknight dinner!  I thought of replacing the mayonnaise with plain, non-fat greek yogurt, and then sweetening it up with a little bit of apple juice.  It was delicious! Especially after adding a bit of Dijon mustard and spicing it up with tarragon. Yum!  Isn't tarragon perfect for chicken?

I added lots of broccoli,  haricot verts, and green apple chunks for a bit of crunch.  Big chucks of veggies and chicken, all atop a toasted whole wheat pita bread.  The dressing is great for any salad, but keep some aside to add to the chicken salad leftovers the next day.  I'm going to start replacing mayonnaise with yogurt more often!

Enjoy!

GREEN TARRAGON CHICKEN SALAD (serves 2 w/leftovers)
1 lb Boneless Chicken Breasts
Haricort Verts (about 2 cups)
Broccoli Florets (about 2 cups)
1 Granny Smith Apple
1/2 cup Tarragon Mustard Dressing (see below)
Kosher Salt & Pepper
Olive Oil
Juice of half a Lemon
1 tablespoon strong mustard

For Tarragon Mustard Dressing:
1/4 cup Dijon Mustard
1/3 cup plain yogurt
1/2 tablespoon chopped Tarragon
1/3 cup all natural Apple Juice (I ♥ Red Jacket Orchards Fuji Apple Juice)
Juice of half a lemon
Salt & Pepper to taste

Preheat the oven to 425F. Season the chicken breasts with a dash of olive oil, salt, pepper, juice of half a lemon, and a tablespoon or so of strong mustard. Place in an oven safe pan and cook until until chicken is thoroughly cooked and starting to brown lightly. Set aside to cool.

...Now to the greens! Bring a large pot of water to a boil, add a generous sprinkle of salt. Separately prepare a large bowl with ice cold water and ice cubes. When the water is boiling, add the broccoli and cook for 45 seconds (yes...only 45 seconds! you want it to be crispy). Remove the broccoli from the boiling water and throw it into the ice water. This will 'shock' the greens and stop it from cooking, leaving it beautifully green and crispy. Repeat with the green beans.  Set aside.

Prepare the tarragon dressing by whisking all the ingredients.  Taste and add salt and pepper.

Chop the chicken and vegetables into small cubes for a chicken salad sandwich, or large pieces for a salad.  Add dressing to taste and mix until every bit is covered in sauce.  Serve immediately, and leave any leftovers in the fridge.

Sunday, January 10, 2010

Honey, Honey :: Local Clover Honey Frozen Yogurt


I know, I know... ice cream in the middle of winter?  But have you ever had one of those weekends when you don't want to go outside?  That was me this weekend.  It was wonderful! ...Sleeping in, lazy breakfasts, lots of cooking, and a brand new stand mixer to play with.  It was the perfect winter weekend!   And being in my cozy, warm apartment all weekend made me crave ice cream.

In a New Years effort to be healthier, I thought: frozen yogurt.  I love greek yogurt, especially drizzled with honey, so wouldn't it be delicious to combine it into a frozen treat?  One problem: no ice cream machine. :-(

Well, after a little googling it turns out you can make ice cream at home without a machine... it just involves a little time.  Basically you make the ice cream (or yogurt) mixture, freeze it, then as it's freezing you break up the ice crystals in order to get a creamy consistency ... instead of a block of ice.  Pretty easy!  Take a look at David Lebovitz's detailed step-by-step instructions... they are very easy to follow.

So I gave it a try.  I used Fage Greek Yogurt and my favorite local Clover Honey from the farmer's market.   It was sooooo delicious.  Incredibly creamy, tangy but sweet.... and you can still taste the honey!  This is going to be addictive. :-)

Enjoy!


HONEY FROZEN YOGURT (adapted from David Lebovitz's recipe via 101 Cookbooks)
3 cups Greek Yogurt (whole milk or 2%, if using 2% strain the yogurt overnight, start w/6 cups)
1/3 cup Honey (more to taste)
1 tsp Vanilla Extract (optional)

If using an ice cream maker:
Combine all ingredients in ice cream maker bowl and freeze according to the machine's instructions

Without an ice cream machine:
Combine all ingredients in a mixing bowl.  Using the whip attachment if using a stand mixer or with a hand mixer, mix at medium speed until well combined and airy.  Pour mixture into a non-stick cake pan (I used a 9") and place in the freezer.  Resist the urge to eat it right away! :-)


After 30 minutes, remove the pan from the freezer. The outer mixture will have started to form ice crystals.  Using a hand blender, or a stand mixer, and whip the mixture for about a minute until combined.

Place back in the pan and in the freezer for another 30 minutes.  Repeat this freeze/whip process two more times.  Depending on your freezer you may need a fourth time, after which your ice cream will be ready!

Serve immediately with drizzled honey.  Yum!


Saturday, January 9, 2010

French Bakery :: Madeleines


Yesterday was a big day... I got my first Kitchenaid Stand Mixer!  It's something I've wanted for a while... imagine all the baking! But where to put it? Remember how small our kitchen is, and how we only have one counter?  Well, after a little re-arranging I convinced myself that it would fit (by re-arranging I mean: our espresso machine is now on the dining table!) oops :-) 

In spite of swooning over all the pastels, I decided to go with the chrome color.  Very industrial looking, it's perfect!  ...So lots of cakes, breads, cookies to come! ...maybe even some fresh pastas :-)

What to bake first?  Madeleines!!!  I love madeleines.  Tiny, airy, buttery cakes beautifully shaped in scalloped shell molds.  They are the perfect size when you are craving a bit of something sweet and the perfect cookie for a warm cup of tea or coffee.  

Madeleines were made famous by the French author Marcel Proust who wrote fondly about them in his book "Remembrance of Things Past".  They are said to originate from the Lorraine region in France, with conflicting stories on how they were named, but one version says that they were created by Louis XV's son-in-law's baker, who named them after her: Madeleine Paulmier. 

You can find the shell shaped molds in most baking supply stores (or online).  I prefer the steel pans over the silicone ones, that's just me... I don't think silicone molds give you the same crispness.


MADELEINES (adapted from The WS Baking Book) makes 24 cookies
1 cup All Purpose Flour
1/2 tsp Baking Powder
1/4 tsp Salt
3 eggs
3/4 cup Sugar
1 tsp Vanilla Extract
Zest of 1/2 a Lemon
1/2 cup unsalted Butter, melted and cooled.

Preheat the oven to 350F.  Brush the madeleine molds generously with melted butter and lightly dust with flour, tapping out any excess.  If you have a non-stick pan, skip the flour.

Sift the flour, baking powder, and salt together into a bowl.

In a large bowl, using an electric mixer on medium, beat the eggs and sugar until fluffy (about 5 minutes).  Add the vanilla and lemon zest and beat until combined.

Using a spatula, fold the flour mixture into the egg mixture until well blended.  Add a bit of the egg mixture to the melted butter.  Then carefully fold the butter into the egg mixture in three parts.

Refrigerate the batter for at least 1 hour.

Drop the batter into the center of the madeleine molds using a tablespoon.  The molds should look close to full with a little mound in the center.  Bake until lightly browned, but springy to the touch.  About 11- 12 minutes.  Be careful not to overbake.


Immediately invert the pan into a cooling rack, and make another batch.  They will keep in an airtight container for up to 3 days.  You can also freeze for up to a month.

Wednesday, January 6, 2010

Happy New Year :: Fried Egg B.L.T. w/ Lemon Aioli


Happy New Year!!!  Can you believe it, 2010?  

A. and I spent the holidays, rang in the new year, and celebrated my b-day (yay! happy b-day to me!) in Miami.  Two weeks of lounging around, lots of eating (way too much!), time with both of our families... and of course: a little sun!  

But after a wonderful vacation,  we are back in NYC in the most frigid weather I can remember. Boohoo :-(   

Well today, my wonderful friends - S. and D. - took me on a birthday lunch to The Smith.  It was the perfect post-vacation cheer-up!   :-)  And I had the most delicious sandwich: a BLT.   Not a regular BLT... it was topped with a fried egg, smothered in a lemony aioli, all on a sourdough bun.  Egg on a BLT?  Yum!!!  ...And the lemon aoili was so perfect, much better than plain mayo.

It was so delicious, I came home and decided to re-create it for A.  He loooved it!  What's not to love about crispy bacon?  I added a little extra lemon to my aioli recipe, and it came out perfect.  The recipe will make about half a cup of ailoi, it keeps well in the fridge so you can enjoy it on other sandwiches or as a dip for fresh veggies.

Ok, so I know that this isn't exactly new years diet friendly recipe, but try using turkey bacon and a sliced hardboiled egg white (instead of fried egg), for a lower fat version.

Enjoy!


FRIED EGG B.L.T. w/ LEMON AIOLI
Fried Eggs (I like the yolk slightly runny)
Crispy Bacon
Sliced Tomatoes
Fresh Sourdough Rolls, lightly toasted


For Lemon Aioli:
2 egg yolks
2 garlic cloves
1/4 teaspoon salt
1/2 teaspoon Dijon mustard
2 teaspoons lemon juice
3/4 cup olive oil

Combine the egg yolks, garlic cloves, salt, mustard, and half the lemon juice.  With an immersion blender  or food processor, pulse until creamy and garlic is finely chopped.  While continuing to mix, add the olive oil a few drops at a time, then continue to add in a steady, slow stream.  The mix will start to thicken.  Continue to process until fully combined.  Taste, and season with remaining lemon juice to taste.  Keep in the fridge for 1 week.

To assemble the sandwich, spread the aoili on both sides of the bread.  Layer the fried egg, bacon, tomatoes, and lettuce. 

Related Posts with Thumbnails